|
|
|
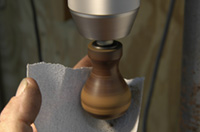
Moving on to the timber work. At left are my mandrels they fit different size knobs. I use these to mount the knob as I don't have a lathe. |
I make sure that there is a washer in the top hole otherwise you will damage the knob nut bearing surface & the knob will always come lose on the plane |
Mounted in the drill press. It dosen't matter if the knob dosen't spin true just use a low speed. I think mine is about 400-500 rpm. |
|
|
|
I start with P120 paper & progress through the grits. I try not to change the shape of the knob with excessive sanding. |
Sanded to P600... Smooth as! |
Now for the tote. This is a bit slower as it has to be done by hand. |
|
|
|
| Finished! The knob & tote are ready for a coat or 2 of lacquer. |
The plane body & frog are ready to be put in the electrolysis bath. I attach a tall rod to act as the cathode (negative attachment) point. |
I make up a solution of water (enough to cover the plane/frog) with LECTRIC washing soda, available at a supermarket. It needs mixing well. |
|
|
|
The best cathode to use is stainless steel. I get mine from a local sheet metal shop. They always have a bin full of scrap for which they are paid by the recyclers. They let me have a few pieces for free. |
Here is my setup. I use a tricky-dicky power supply that's rated at 3 amps. The negative lead is attached to the plane & the positive lead is attached to a sacrificial piece of stainless steel. I'l leave it cook overnight. |
When you fire it up you should see lotz of tiny bubbles down the length of the plane |
|
|
|
| This is what the soup looks like in the morning. |
Straight out of the bath, you can see where the japaning is bubbled. |
Rinsed off & ready to be scrubbed down. |
|
|
|
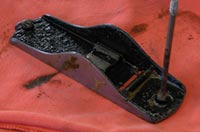
All clean! I then give it a quick wash with Methylated Spirits & put in the sun to dry. |
Now the frog gets the same treatment as the plane body. To make it easy to attach the negative lead I bolt on a piece of copper wire that will be above the liquid level. |
While the frog is brewing I mask the plane body. |
|
|
|
I press down on the masking tape at the edge so I can see the outline of the plane underneath. Then it a simple matter of cutting using a scalpel. It's easier to start in the middle. |
Easy as! |
I then mask the other side & then the sole. |
|
|
|
The machined surfaces in the plane body need masking to. |
The body is all masked now. |
While waiting for the frog to cook I spray the knob & tote. 2nd coat a couple of hours later.
They have been sprayed but not hand rubbed with wax & steel wool |
| |
|
|